I like to think of tacos in two camps that follow seasonality: Fresh and rich. Fresh is synonymous with summer and involves the best produce and lighter flavors. Rich comes with winter and is deeply flavored and hearty. Below are two examples of such seasonal tacos. For more on this, read my Brief Introduction to Tacos.
Have a question? Ask me anything!
Fresh Tacos
A summer taco with lovingly pan roasted pork or chicken, beautiful sweet summer heirloom tomatoes, avocado, crisped garlic, jalapeno and cilantro.

Ingredients – Makes Six Tacos
6-12 medium sized corn tortillas (either single stacked or double stacked, based on your preference and the thickness of the tortillas)
Neutral cooking oil for brushing tortillas
450 g (about 16 oz) pork tenderloin or chicken breast
600 g (about 20 fl oz) filtered water
30 g (about 1 tbsp) kosher salt
6 g (about 1.5 tsp) granulated white sugar
100 g (about 3.5 oz or one half a medium fruit) very ripe Hass avocado, deseeded, peeled and forked to coarsely mash
30 g (about 2 tbsp) lime juice
90 g (about 1 cup) assorted varietals ripe, sweet heirloom tomatoes (such as green zebra and brandywine varietals), diced
1 medium jalapeno, diced
2 sprigs fresh cilantro, leaves only, coarsely chopped
15 g (about 1 tbsp) sweet, buttery and mild California or Spanish extra virgin olive oil
15 g (about 2-3 cloves) garlic, finely diced
A pinch of red pepper flakes
Substitutions
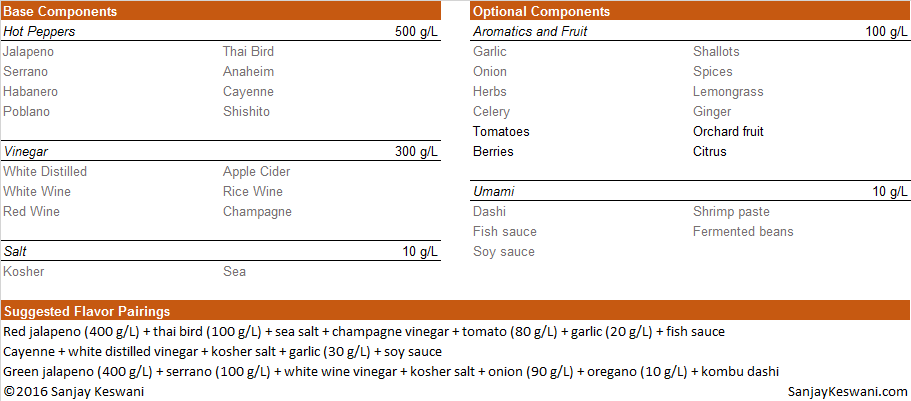
You may substitute any of the hot sauces I suggest in my hot sauce guide, if desired, in place of the lime juice.
Preparation
- In a large bowl, combine the water, salt and sugar, stirring until the liquid is entirely clear to create a brine. Add the pork or chicken to the brine and allow to rest for at least 30 minutes at room temperature, but no greater than one hour. Alternatively, you can brine in an airtight container in the refrigerator for at least two hours but no greater than eight hours. In the refrigerator, the salt will take longer to penetrate the meat. Given the extended length of time, however, the meat will tenderize more than at room temperature, but will lose some degree of flavor concentration to the brine. Decide which is best for your taste and the meat you have based on its tenderness level when raw. I recommend that you experiment to decide what you like best and what is best for the meat you have access to. In general, I prefer the quicker, room temperature brining. When brining is complete, remove meat and discard brine. Thoroughly pat dry with a paper towel. If brined in the refrigerator, rest at room temperature to warm to at least 15 °C (59 °F) before cooking.
- Preheat oven to 150 °C (302 °F). Combine the garlic and olive oil in a small, oven safe ramekin and ensure the garlic is entirely submerged in the oil. If required to fully submerge garlic, add just enough additional oil. When the oven is at temperature, add the ramekin to the oven. When the garlic is at a steady fry in the oil, about 5 minutes, give the mixture a careful but thorough stir. Fry for an additional 5 minutes then add the pinch of red pepper flakes, carefully stirring to fully integrate. At this point the garlic should start to brown slightly but evenly. Continue to fry in the oven until the oil has tinged to a light red-brown color, about seven to 10 additional minutes. Separate the garlic and pepper from the oil by pouring over a fine mesh strainer such as a chinois into another container. Set aside garlic and pepper mixture and infused oil separately.
- Preheat oven to 200 °C (392 °F). Heat a heavy frying pan to approximately 225 °C (437 °F) over medium heat. Add half the oil and coat the pan evenly. Place meat in the pan and gradually brown on all sides, about two to three minutes at a time. As you flip the meat, ensure that it is browning on all sides evenly and no char is developing. If char is developing, reduce the flame and continue to cook until properly browned. The meat is ideally cooked when it reaches an internal temperature of 65 °C (149 °F) at the thickest part. If the temperature has not reached 65 °C by the time the meat is fully browned, place the meat on a greased baking sheet and roast in the oven until the internal temperature reaches 65 °C at the thickest part. Remove from the oven and rest for at least five minutes. After resting, slice meat into one to two centimeter cubes (about 0.5 to 0.75 inches). Toss with remaining infused oil and set aside.
- Heat a large nonstick skillet to 200 °C. Brush tortillas on both sides with a thin coat of neutral cooking oil. In batches, heat in the skillet, flipping about every 30 to 45 seconds until tortillas soften thoroughly, are aromatic, browned very slightly, but do not blacken. Depending on the thickness of the tortilla, timings may vary somewhat, but each batch should not take longer than a couple minutes. The goal is to keep the entire tortilla moist, including the ends. If the ends dry out, you are heating for too long or the skillet is too hot.
- Construct each taco by placing one tortilla (or two tortillas in a stack, if you prefer) on a plate. Using the ingredients in equal parts across all six tacos, smear the mashed avocado down the center of the tortilla. Top with meat, then with the fried garlic and pepper mixture. Next, top with lime juice, then tomatoes,jalapeno, and lastly cilantro. Serve immediately.
Rich Tacos
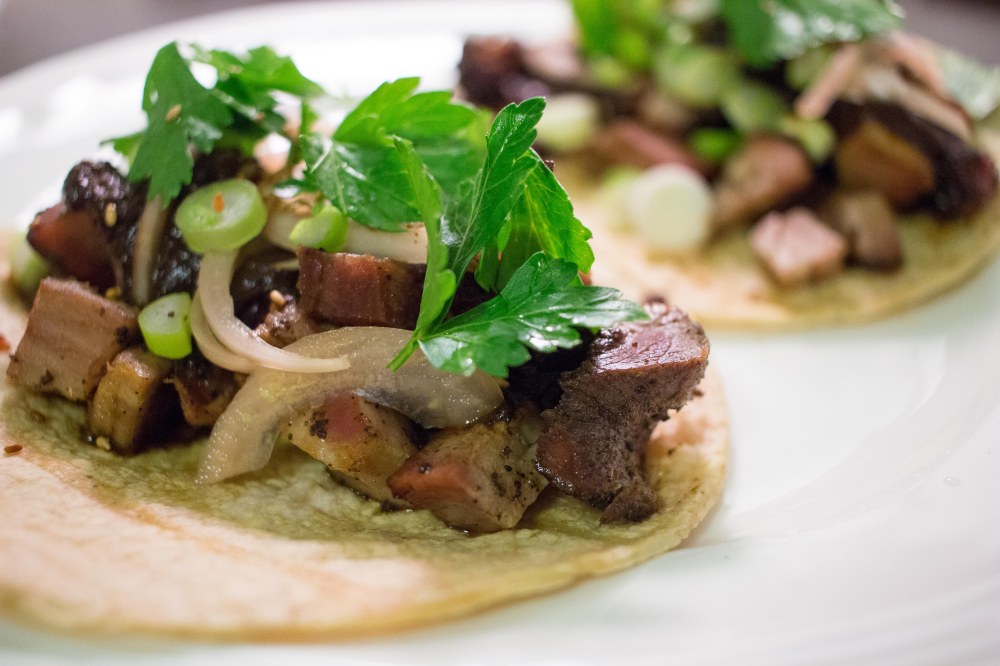
A taco with delicately spiced and braised pork or beef, quick pickled onion, green onion, toasted sesame seeds, jalapeno and cilantro.
A modified version of this recipe appears in my Guide to Spice Blending with a slightly more complex spice blending technique. Both versions are worth trying and comparing.
Ingredients – Makes Six Tacos
6-12 medium sized corn tortillas (either single stacked or double stacked, based on your preference and the thickness of the tortillas)
Neutral cooking oil for brushing tortillas
500 g (about 18 oz) pork shoulder or beef brisket
1 L (about 34 fl oz) dashi of your choice, chicken or other bone broth recommended
50 g (about 5 tsp) kosher salt
500 g (about 17.5 oz or 1 large) yellow onion, peeled. One-quarter thinly sliced and three-quarters finely diced.
120 g (about 3.5 oz or 12 to 18 cloves) garlic, thinly slivered width-wise
400 g (about 14 oz) can peeled plum tomatoes, thoroughly crushed
2 g (about 2 tsp) crushed red pepper
8 g (about 1.5 tbsp) cumin seeds
6 g (about 1.5 tbsp) coriander seeds
3 medium sprigs fresh Mexican oregano with the stem
25 g (about 30 mL or 1 fl oz) California extra virgin olive oil
50 g (about 1.5 fl oz) distilled white vinegar
150 g (about 5 fl oz) filtered water
50 g (about 4 tbsp) granulated white sugar
30 g (about 2 tbsp) lime juice
4 g (about 2 tsp) white sesame seeds
1 medium green onion, sliced into thin rings
1 medium jalapeno, diced
2 sprigs fresh cilantro, leaves only, coarsely chopped
Substitutions
You may substitute any of the hot sauces I suggest in my hot sauce guide, if desired, in place of the lime juice.
Preparation
- In a medium bowl, combine the vinegar, water and sugar, stirring until the liquid is entirely clear to create a quick pickling liquid. Add the sliced onion, ensuring that slices are separate (not sticking together) and fully submerged. Soak at room temperature, covered, for at least one hour. May be kept soaking in the refrigerator for up to one week.
- Preheat oven to 150 °C (302 °F). In a baking sheet, arrange the cumin seeds in an even layer. Roast until the color deepens to medium brown, about five minutes. With a mortar and pestle, combine cumin and coriander and grind down to a coarse powder. Combine with crushed red pepper and set aside.
- Preheat oven to 180 °C (356 °F). Arrange sesame seeds in a single layer on a baking sheet. Place in the oven for five minutes and remove, tossing seeds around in the pan. Ensure the seeds are in a single layer and place back in the oven, checking every two minutes until light golden. Set aside.
- In a pressure cooker or dutch oven over medium heat, heat the olive oil to about 225 °C (437 °F). The oil will begin to “shimmer” with subtle waves moving across the surface of the oil at this temperature. Place meat in the pressure cooker or dutch oven and gradually brown on all sides, about three to five minutes on each side. As you flip the meat, ensure that it is browning on all sides evenly and no char is developing. If char is developing, reduce the flame and continue to cook until browning reaches a moderate level, that is, no crust has formed but the meat is golden brown on all sides. Set aside.
- Add the remaining yellow onions and sauté until they are lightly browned, about 20 minutes, folding them over about every minute to prevent charring. If charring begins to occur, reduce heat.
- Add garlic, oregano and spice mixture, cooking until just aromatic, about one minute, folding them together with the onions. Add canned tomatoes and the salt. Bring to a simmer and then add dashi. Return to simmer.
- Carefully place a trivet at the bottom of the pressure cooker or dutch oven. Place the meat on top of the trivet being sure to push down through the vegetables. The meat need not be fully submerged but should be substantially covered. If using a pressure cooker, seal and cook at 15 pounds per square inch (high pressure) for 30 minutes if meat with a light chew is desired, 45 minutes if very tender meat that still holds its shape is desired and one hour for meat that is fall-apart tender. Note, the pressure cooker will achieve the best and quickest results. For the dutch oven, set flame to low and bring to a light simmer, checking every 15 minutes for the first hour to ensure the light simmer maintains and a more rapid simmer or boil does not develop, adjusting heat accordingly. As a rule of thumb, multiply the pressure cooker timings by three for the dutch oven (1.5 hours, 2.25 hours and three hours, respectively). That said, cooking times may vary by as much as 30 minutes based on the level of your simmer, so be mindful of your meat, so to speak. When done, slice meat into one to two centimeter cubes or pull apart, toss with braising liquid and set aside.
- Heat a large nonstick skillet to 200 °C. Brush tortillas on both sides with a thin coat of neutral cooking oil. In batches, heat in the skillet, flipping about every 30 to 45 seconds until tortillas soften thoroughly, are aromatic, browned very slightly, but do not blacken. Depending on the thickness of the tortilla, timings will vary somewhat, but each batch should not take longer than a couple minutes. The goal is to keep the entire tortilla moist, including the ends. If the ends dry out, you are heating for too long or the skillet is too hot.
- Construct each taco by placing one tortilla (or two tortillas in a stack, if you prefer) on a plate. Using the ingredients in equal parts across all six tacos, start by placing the meat in a line across the middle atop each taco. Next, add a small spoonful of braising liquid, followed by the pickled onion, sesame seeds, green onion, jalapeno, lime juice and lastly, cilantro. Serve immediately.
- Any left over braising liquid can be enjoyed as a soup or the process repeated with a little additional water, meat and beans to make a fine stew.

6 Comments Add yours