This is part of an ongoing series of aromatics and their culinary use. Other articles in this series include An Abridged List of Aromatics, A Quick Guide to Herbs and Spices and Flavor Pairings.
The status of spice knowledge in the Western world has been entirely flabbergasting. The fact that no one in the West—in print or in person—has yet provided anyone else with so much as a theoretical framework around which to base a rigorous spice blending technique is shameful. It is, after all, not just important which spices you add to a dish, but also in what proportions. To date, everything where spices are concerned is entirely ad hoc; literally, chefs standing around, tasting their dishes and thinking, “I guess this could use a bit of clove.” I’ve searched and there is literally not much more available than lone chefs guided by vague tradition and his or her own subjective taste.
Regardless of whether or not it had yet to be discovered, by my view there had to be something more fundamental, some ordering of the chaos to sort through not just innumerable spices, but also herbs and other aromatics more broadly. There is order to human taste, an evolutionary basis to its existence, and so it should follow that our taste perception of a world of flavor can itself be conceptually ordered. Furthermore, throughout Asia it would seem that traditional cooking has made ample use of aromatics for as long as anyone knows, blending an array of them together to absolutely stunning affect. In India in particular, at least a thousand years of aromatic blending experience must certainly have yielded something more substantive for me to study and understand.
And so I went to India, traveling from north to south to discover this hidden knowledge of the East. I cooked with chefs across the country and across a variety of regional traditions throughout India. I traveled to 14 major cities and worked with or interviewed many chefs of note. What I quickly began to realize was that my project was one not just that no one had ever considered but one that no one saw much value in. In India, it would seem, a thousands of years of ad hoc chef experience simply yielded really good, regionally-based, dish-for-dish rules of thumb.
Deflated, I returned to my original hypothesis that there was some order to be found in this apparent spice chaos. One thing that did stand out to me was that there were indeed some commonalities to all of the recipes I had gathered, not just within particular Indian traditions but across them. Certain aromatic blending rules of thumb were very commonly employed, ratios of one aromatic to another that appeared again and again. Consulting my notes, I began to see more pronounced parallels. When I returned home, I began to experiment rigorously, attempting to break down the purpose served by each aromatic in a broader recipe, how they interacted with each other in terms of complimenting, enhancing and balancing. To my delight, I ultimately found my initial hunch to be correct: There is method to the madness, order in chaos.
Towards a Spice Blending Paradigm
As I worked through the various recipes, understanding them more deeply, aromatics began to sort out in my mind into four general categories: Savory, sweet, delicate and pungent. Savory and sweet can be thought of in a similar manner to yin and yang: They harmonize and balance one another. Without some of the one, the other tastes overly harsh. Think of savory cumin unrestrained by the softening, sweet flavors of cinnamon.
Delicate aromatics, like coriander seeds, exist in the background, adding nuance and lightness. These are characterized by their subtlety and knack for adding complexity without much modifying other flavors. You’d generally be hard pressed to make delicate aromatics the dominant category. They exist in their own, delicate space. Pungent aromatics, like cloves, are extremely sharply flavored and bold. They directly perturb savory and sweet aromatics, in low quantities to enhance them. In higher quantities, however, pungent aromatics tend to take over a dish and become the star themselves, with savory and sweet serving a supporting, enhancing role in a curious reversal. The following chart, illustrates these basic relationships:

So, looking at the chart, we know savory and sweet balance and harmonize one another while pungent is the insurgent that can enhance in small quantities but overpowers in large quantities, while delicate sits atop and nuances. If we wish the outcome of our dish to be savory-forward, we should add the largest amount of savory aromatics, balancing their harshness with sweet aromatics. If we wanted to nuance or enhance the savory flavors further, we could choose to add delicate or pungent aromatics, respectively, but it’s not absolutely necessary.
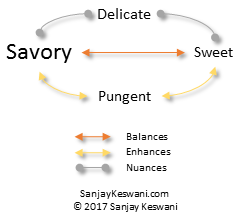
Likewise, a similar logic would apply to a sweet-spiced dish.

If we wanted our pungent flavors to take over, adding a larger quantity of pungent aromatics to our dish, our savory and sweet aromatics go into a supporting role, working to enhance the pungent flavors, in something of a role reversal.

It’s worth noting that these categories are mostly sorted based upon the common botanical origins of each aromatic, their researched flavor chemical content and my personal subjective taste perception (you can find a complete listing of the spices, herbs and aromatic vegetables I’ve worked with, sorted by category here). This is by no means intended to be a rigid framework, but rather a loose guiding paradigm. You may find some aromatics hard to categorize and others that may straddle two categories. Nature is messy, after all. I have also not rigorously researched and tested my paradigm across all flavor components the world over. All of that said, in my kitchen this aromatic blending paradigm has proven extremely useful in creating complex, harmonized flavors from whatever source including spices, herbs, aromatic vegetables and the like.
For your convenience, I wanted to add a general rule of thumb for aromatic blending: For whatever your dominant flavor category is (savory, sweet or pungent), you should include, by weight, one part of a nondominant flavor category for every four parts of the dominant. So, in the case of savory, if we included 8 g of cumin in a dish, we could include up to 2 g each of cinnamon (sweet) and clove (pungent). For delicate aromatics, I would include no more than the dominant aromatic, that is, up to a maximum of a one-to-one ratio, by weight. To put together much of the above, complete with the categories, their relationships, the ratios and illustrative examples, here is a single summary chart.
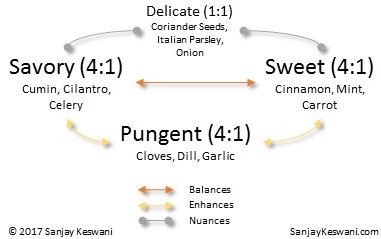
Note that it becomes difficult in practice to apply this rule of thumb between, say, fresh and dried herbs due to the difference in water content, let alone applying the ratio to onions versus cardamom. In general, compare like with like: Dried herbs to dried herbs, fresh herbs to fresh herbs, fresh aromatic vegetables to fresh aromatic vegetables, etc.
The Subtle Art and Science of Flavor Extraction
Understanding the interaction of aromatics isn’t worth much if we don’t quite understand how to first get those flavors into our food. This is what I refer to as flavor extraction. That is, getting the flavor of cinnamon, for example, into a dish. At the most basic level, extraction can be thought of in terms of tea. Without getting too far off track, let’s consider tea for the moment.
We make tea with tea leaves and water. In the case of making really good tea, in addition to using high quality ingredients, it’s important to get the temperature of the water, timing of the steep and the amount of tea leaves just right to produce the perfect cup. Steep it at too high a temperature, for too long a period or with too much tea leaf, and you may end up with bitter tea, lacking in nuance.
Very basically, the flavor components of tea can be broken down into three basic categories, what I’ll refer to “Initial,” “Base” and “Deep” extracted flavors. The initial extracted flavors in tea come out first, are light, volatile and generally the most complex. These flavors are lost first as tea grows stale with time as well as when steeping tea for too long or at too high a temperature. The base extracted flavors are what we more commonly associate with any particular tea. They’re the pleasant core flavor of the tea, are less complex than initial flavors and generally linger even after tea begins to turn stale or if tea is extracted for too long or at too high a temperature. Finally, there are the deep extracted flavors from tea. These flavors are usually vegetal, bitter, tannic and generally undesirable in too great a concentration. If you steep for too long or too hot, you start to get these flavors in your cup. Luckily, deep extraction flavors aren’t particularly discernible until after significant steeping time.

And everything is like tea. Kind of. In the sense that all extraction more or less conforms to the chart above, everything is like tea. To return to something like cinnamon (or any spice, herb, etc.), you can break down how its flavors extract into a dish over time in a similar way we did with tea into water: Initial, base and deep.
The punchline here is that when we’re blending aromatics, we want to be mindful of the flavor we are targeting from each individual aromatic. If we want deep flavor from cumin and cinnamon, but the lightest, initial flavor from coriander seeds, we don’t add them all to our dish at the beginning stages of cooking. If we do, we would get deep cumin and cinnamon flavor, but also deep coriander flavor. If, on the other hand, we use coriander seeds at the very end, what I refer to as a finishing aromatic, we end up with deep cumin and cinnamon, and the lighter initial flavors of coriander. So, blending aromatics isn’t just about which ones you add and in what proportion, but also when you add them.
Spice Storage and Use Quick Tips
Lastly, couple of rules of thumb when storing and using dried herbs and spices:
- Always use whole herbs and spices, not pre-ground.
- Store whole herbs and spices in an airtight container, preferably vacuum sealed.
- Properly stored herbs and spices last up to six months in airtight container or up to a year under vacuum seal, generally speaking.
- Grind only enough herbs and spices as you intend to use, immediately before use.
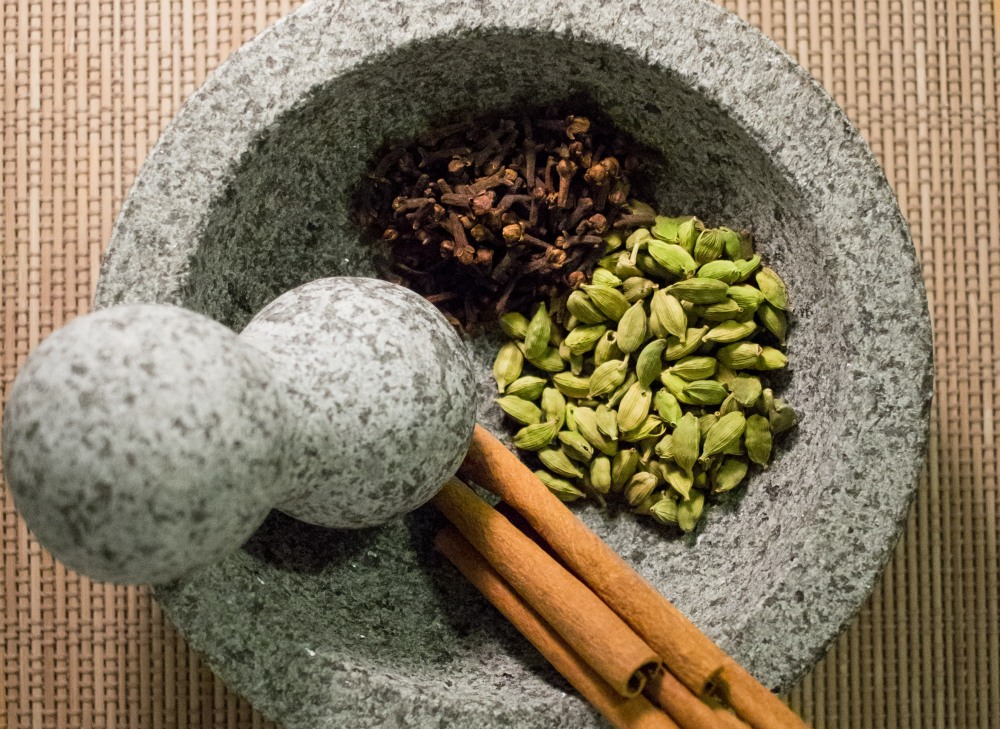
- I personally start to grind with a coffee blade grinder and finish to desired fineness on a granite molcajete.
- When using herbs and spices in hot oil (as in a saute), I always first add a small amount of water to create a thick paste. This helps act as a temperature buffer, allowing the herbs and spices more time to release their flavor before burning.
With that, let us turn to cooking!
Have a question? Ask me anything!
Rich Tacos Redux
The below rich taco recipe has been adapted from a previous article to illustrate the benefits of spice blending under the paradigm described above. The only difference here is that small quantities of cinnamon and clove have been added and the cooking technique slightly modified. The difference, however, is quite pronounced.

Ingredients – Makes Six Tacos
6-12 medium sized corn tortillas (either single stacked or double stacked, based on your preference and the thickness of the tortillas)
Neutral cooking oil for brushing tortillas
500 g (about 18 oz) beef brisket
1 L (about 34 fl oz) dashi of your choice, chicken or other bone broth recommended
50 g (about 5 tsp) kosher salt
500 g (about 17.5 oz or 1 large) yellow onion, peeled. One-quarter thinly sliced and three-quarters finely diced.
120 g (about 3.5 oz or 12 to 18 cloves) garlic, thinly slivered width-wise
400 g (about 14 oz) can peeled plum tomatoes, thoroughly crushed
2 g (about 2 tsp) crushed red pepper
8 g (about 1.5 tbsp) cumin seeds
6 g (about 1.5 tbsp) coriander seeds
2 g (about 1 small stick or 0.75 tsp ground) cassia cinnamon, ground finely
1 g (about 6 cloves or 0.5 tsp ground) cloves, ground finely
3 medium sprigs fresh Mexican oregano with the stem
25 g (about 30 mL or 1 fl oz) California extra virgin olive oil
50 g (about 1.5 fl oz) distilled white vinegar
150 g (about 5 fl oz) filtered water
50 g (about 4 tbsp) granulated white sugar
30 g (about 2 tbsp) lime juice
4 g (about 2 tsp) white sesame seeds
1 medium green onion, sliced into thin rings
1 medium jalapeno, diced
2 sprigs fresh cilantro, leaves only, coarsely chopped
Substitutions
You may substitute any of the hot sauces I suggest in my hot sauce guide, if desired, in place of the lime juice.

Preparation
- In a medium bowl, combine the vinegar, water and sugar, stirring until the liquid is entirely clear to create a quick pickling liquid. Add the sliced onion, ensuring that slices are separate (not sticking together) and fully submerged. Soak at room temperature, covered, for at least one hour. May be kept soaking in the refrigerator for up to one week.
- Preheat oven to 150 °C (302 °F). In a baking sheet, arrange the cumin seeds in an even layer. Roast until the color deepens to medium brown, about five minutes. With a mortar and pestle, grind down the cumin to a coarse powder, combine with the crushed red pepper, cinnamon and clove, then set aside. Separately, grind down the coriander seeds and set aside.
- Preheat oven to 180 °C (356 °F). Arrange sesame seeds in a single layer on a baking sheet. Place in the oven for five minutes and remove, tossing seeds around in the pan. Ensure the seeds are in a single layer and place back in the oven, checking every two minutes until light golden. Set aside.
- In a pressure cooker or dutch oven over medium heat, heat the olive oil to about 225 °C (437 °F). The oil will begin to “shimmer” with subtle waves moving across the surface of the oil at this temperature. Place meat in the pressure cooker or dutch oven and gradually brown on all sides, about three to five minutes on each side. As you flip the meat, ensure that it is browning on all sides evenly and no char is developing. If char is developing, reduce the flame and continue to cook until browning reaches a moderate level, that is, no crust has formed but the meat is golden brown on all sides. Set aside.
- Add the remaining yellow onions and sauté until they are lightly browned, about 20 minutes, folding them over about every minute to prevent charring. If charring begins to occur, reduce heat.
- Add garlic, oregano and cumin spice mixture, cooking until just aromatic, about one minute, folding them together with the onions. Add canned tomatoes and the salt. Bring to a simmer and then add dashi. Return to simmer.
- Carefully place a trivet at the bottom of the pressure cooker or dutch oven. Place the meat on top of the trivet being sure to push down through the vegetables. The meat need not be fully submerged but should be substantially covered. If using a pressure cooker, seal and cook at 15 pounds per square inch (high pressure) for 30 minutes if meat with a light chew is desired, 45 minutes if very tender meat that still holds its shape is desired and one hour for meat that is fall-apart tender. Note, the pressure cooker will achieve the best and quickest results. For the dutch oven, set flame to low and bring to a light simmer, checking every 15 minutes for the first hour to ensure the light simmer maintains and a more rapid simmer or boil does not develop, adjusting heat accordingly. As a rule of thumb, multiply the pressure cooker timings by three for the dutch oven (1.5 hours, 2.25 hours and three hours, respectively). That said, cooking times may vary by as much as 30 minutes based on the level of your simmer, so be mindful of your meat, so to speak.
- When meat is done, slice into one to two centimeter cubes or pull apart. In a skillet, add about 250 mL (about 1 cup) of braising liquid and the ground coriander seeds, stirring to integrate. Bring to a simmer over a medium flame and let simmer for one minute. Add cubed meat and toss to coat. Set aside.
- Heat a large nonstick skillet to 200 °C. Brush tortillas on both sides with a thin coat of neutral cooking oil. In batches, heat in the skillet, flipping about every 30 to 45 seconds until tortillas soften thoroughly, are aromatic, browned very slightly, but do not blacken. Depending on the thickness of the tortilla, timings will vary somewhat, but each batch should not take longer than a couple minutes. The goal is to keep the entire tortilla moist, including the ends. If the ends dry out, you are heating for too long or the skillet is too hot.
- Construct each taco by placing one tortilla (or two tortillas in a stack, if you prefer) on a plate. Using the ingredients in equal parts across all six tacos, start by placing the meat in a line across the middle atop each taco. Next, add a small spoonful of braising liquid, followed by the pickled onion, sesame seeds, green onion, jalapeno, lime juice and lastly, cilantro. Serve immediately.
- Any left over braising liquid can be enjoyed as a soup or the process repeated with a little additional water, meat and beans to make a fine stew.

Great post, I still have a cupboard full of spices I bought at the market in India. The tea analogy is spot on and illustrates how you can ruin a recipe by using an ingredient in the wrong way even if its in the right ratio.
That’s absolutely right and it’s subtleties like that which often make spices seem inscrutable to cooks new to spices. Hopefully my guide will prove helpful. Thanks for your comment!
I’ve gotten really into cooking lately, and tacos are one of my favorite things to make. However, I’ve run out of recipe ideas. I loved reading through all of your advice about using spices, and how to blend them properly. The one that stuck out to me was what you said about always using whole spices, that have been vacuumed sealed.
Hi Maxine! Thanks for your kind remarks. With the recent attention coffee has been getting with a mind to freshness and a la minute grinding, I feel like spices deserve the same attention. The same principles may be applies to both, although most spices have a longer shelf life than most coffees.
If you’re interested in reading more about tacos, I have two articles that you may find helpful. The first may help you think differently about tacos and help break down any limitations you’ve encountered: https://sanjaykeswani.com/2017/02/09/a-brief-introduction-to-tacos/
The other are two taco recipes that each use very different cooking techniques and ingredients. Perhaps you may find some inspiration in that: https://sanjaykeswani.com/2017/02/09/a-brief-introduction-to-tacos/
Lastly, I’m doing an Ask Me Anything, so if you have any specific questions about spices or any other food science related topic, please feel free to ask: https://sanjaykeswani.com/2017/04/12/ask-me-anything-part-1/
Let me know how it turns out!
Thanks for making spices & herbs more understandable. I hadn’t considered the extraction component. It can be a game changer!
Thanks for the kind words, Kim! Here is a handy printable guide with an abridged list of aromatics that you might find helpful: https://sanjaykeswani.files.wordpress.com/2017/03/an-abridged-list-of-aromatics-sanjaykeswani-com1.pdf